

A powerful fragrance won’t rescue a van that still holds yesterday’s wet boots, damp workwear and lunch wrappers. If you’re figuring out how to keep a builder's van smelling clean, start by finding and removing what’s causing the odour, rather than covering it with another scent.
Dust settles into corners, tools bring grime along for the ride, and damp kit can leave the interior smelling musty. A quick spray may offer a temporary lift, but a genuinely fresh van takes a few consistent habits and a proper clean.
This guide shows you how to remove everyday odour sources, build a repeatable clean-as-you-go routine and help prevent smells from returning between jobs. You’ll also learn why drying and ventilating the van matter, especially after cleaning or storing wet equipment. Once the interior is clean and dry, fragrance can add the finishing touch. Vent clips, sprays and wood diffusers offer different ways to bring a fresh scent to your work van.
Key Takeaways
- Learn how to keep a builder's van smelling clean by removing odour sources rather than relying on fragrance to cover them.
- Use a simple cleaning sequence: clear out rubbish and debris, wipe surfaces, then dry and ventilate the interior.
- Build a quick end-of-shift reset and a weekly clean to stop damp kit, food and dust building up.
- Follow cleaning product labels and test products on an inconspicuous area before using them more widely.
- Once the van is clean and dry, compare vent clips, sprays and wood diffusers to find a fragrance format that fits your routine.
Why a builder’s van smells, and why freshener alone will not fix it
Boots, wet workwear, dusty tools and food on the move all take a toll on a builder’s van. A clean-smelling interior isn’t simply one with a strong fragrance in the air. It’s a van where the odour sources have been removed, surfaces cleaned and the air refreshed.
Smells come from substances in the air, including volatile compounds. Fragrance can add a more pleasant scent, but it won’t clear damp clothing, a spilled drink or trapped grime. That’s the difference between masking an odour and dealing with its cause. For a simple overview of what causes odors, see the background on how smells are produced and perceived.
What causes persistent smells in a builder’s van?
Moisture and residue are common culprits. Wet boots, towels and workwear left inside after a rainy shift can make the cabin smell musty. Food wrappers, forgotten rubbish and drink spills can leave stale or sour smells around seats and storage. Dust and grime also settle in less obvious places, including beneath floor mats, along seat seams and in cargo-area corners.
Use the smell as a clue, not a diagnosis. Check likely sources before reaching for fragrance:
- Musty or damp: wet kit, mats or fabric that hasn’t dried fully.
- Sour or stale: old food, rubbish or a drink spill near a seat or in storage.
- Dusty or gritty: debris gathered around mats, seams or cargo corners.
- Strong after a job: equipment or materials that may have left residue in the load area.
How to tell whether the smell is dirt, damp, or stale air
Notice when the smell appears. If it’s strongest after rain or when you open the van the next morning, check for damp clothing, mats and kit. If it follows a meal or drink, inspect the cab and storage for wrappers, crumbs or spills. If the air smells stale throughout, ventilation may help, but check for hidden rubbish and grime first.
Check systematically: empty concealed storage, lift out floor mats, inspect beneath seats where accessible, then work through the cargo area and its corners. Look and feel for dampness as well as visible dirt. If moisture keeps returning or you suspect a leak, investigate the cause instead of trying to cover the smell with fragrance. That’s the real starting point for how to keep a builder's van smelling clean.
How to clean a builder’s van step by step
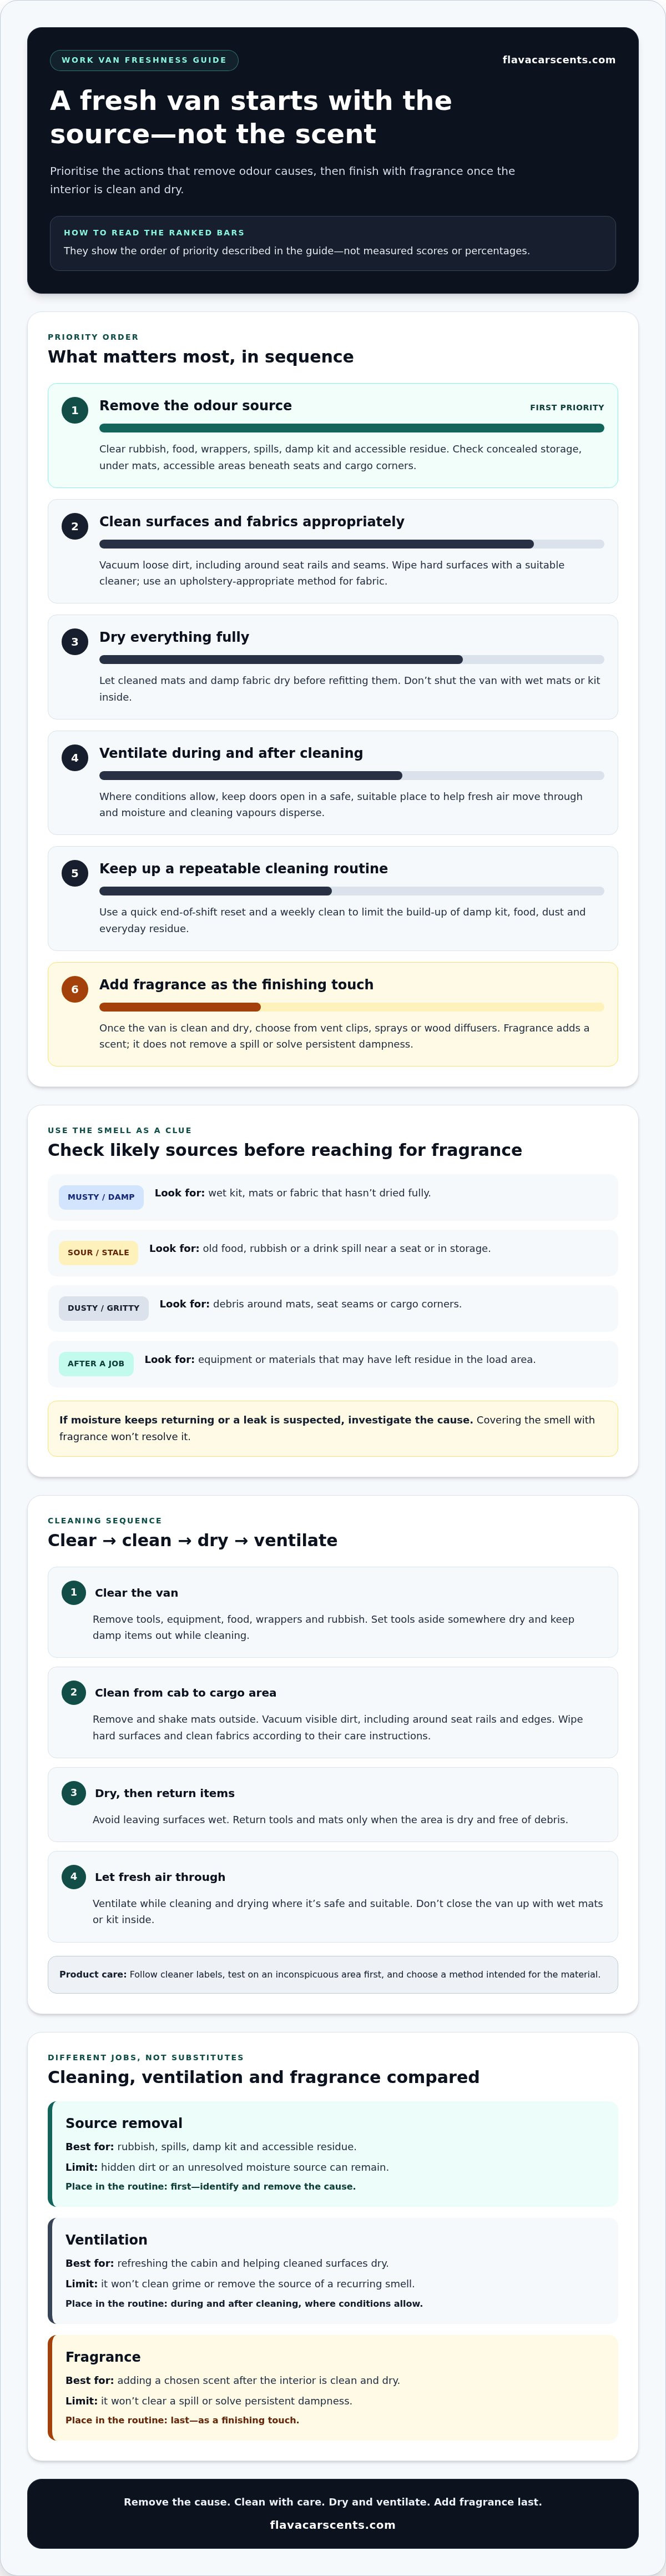
A proper clean works best in sequence. Remove loose items and debris, clean hard surfaces and fabrics appropriately, dry everything thoroughly, then ventilate the van. This makes hidden spills easier to spot and helps stop moisture lingering in the cabin.
Clear out tools, rubbish, and removable mats first
Take out tools, equipment, food, wrappers and rubbish before you start. With the load area empty, hidden spills and debris are easier to find. Set tools aside somewhere dry, and keep damp items out of the van while you clean.
Remove the mats and shake them out outside. Vacuum visible dirt from the floor, including around seat rails and along the edges, before wiping surfaces. Clean the storage area too. Return tools only once the area is dry and free of debris.
Clean touchpoints, upholstery, and cargo-area surfaces
Work from the cab towards the cargo area. Wipe hard surfaces such as the steering wheel, handles, dashboard and storage surfaces with a suitable cleaner. Follow the product label and test it on an inconspicuous area first to check it’s suitable for the material. The guide to getting rid of vehicle odours also highlights cleaning carpets and wiping interior surfaces as practical steps.
For fabric, use a method intended for upholstery rather than treating it like plastic or metal. Vacuum seat seams and cargo-area corners where grit gathers. Clean fabric and removable mats according to their care instructions, and avoid leaving surfaces wet. A quick wipe can turn into a lingering damp smell if moisture gets trapped in upholstery.
Dry thoroughly and let fresh air through
Give cleaned mats and any damp fabric time to dry fully before putting them back. Keep the doors open while cleaning and drying, in a safe, suitable place, to ventilate the interior and help moisture and cleaning vapours disperse. Don’t shut the van up with wet mats or kit inside.
That’s the practical foundation for how to keep a builder's van smelling clean: clear the space, clean each material with care, and make drying and ventilation part of the job. Once the van is clean and dry, fragrance can add a finishing touch. Car fragrance options include vent clips, sprays and wood diffusers.
Odour removal compared: cleaning, ventilation, and van fragrance
Each step has a different job. Cleaning removes dirt and residue you can reach. Ventilation helps fresh air move through the cabin and supports drying. Regular upkeep limits build-up, while fragrance adds a chosen scent. Fragrance won’t remove a spill or solve persistent dampness. For how to keep a builder's van smelling clean, use these methods in the right order rather than treating them as substitutes for one another.
| Method | Best use | Limitation | Place in the routine |
|---|---|---|---|
| Source removal | Rubbish, spills, damp kit and accessible residue | Hidden dirt or an unresolved moisture source can remain | First, identify and remove the cause |
| Ventilation | Refreshing the cabin and helping cleaned surfaces dry | Won’t clean grime or remove the source of a recurring smell | During and after cleaning, where conditions allow |
| Routine cleaning | Keeping dust, crumbs and everyday residue from building up | Needs repeating, and won’t fix a leak or persistent dampness by itself | As part of regular van upkeep |
| Fragrance | Adding a finishing scent to a clean, dry interior | Can mask an odour without removing its cause | Last, once the van is clean and dry |
When cleaning and ventilation are the right first move
Start with visible dirt, food spills and residue you can safely reach. Remove rubbish, clean the affected surface using a suitable method, and give damp areas time to dry. Ventilate the van when conditions allow, especially after wiping surfaces or cleaning mats. If a musty smell keeps returning, look for the moisture source rather than trying to cover it with scent.
For a wider overview of scent formats and how they differ, read the complete car air freshener guide.
When a car fragrance can finish the routine
Once the interior is clean and dry, choose a format that suits how you use the van. Vent clips attach at the air vent, sprays let you add fragrance according to their instructions, and wood diffusers offer another option for the cabin. Follow the directions for whichever format you choose, and avoid overusing fragrance. The goal is a fresh, considered atmosphere, not a stronger layer over an unresolved smell.
For the finishing touch, explore Flava car scents and choose a fragrance format for your clean-van routine.
A realistic daily and weekly routine to keep a work van fresh
A van stays fresher through small resets, not one big clean after the smell becomes impossible to ignore. Keep rubbish, food and damp kit from accumulating, then use a weekly tidy to catch dust and residue before they build up. That’s a practical rhythm for how to keep a builder's van smelling clean without turning every shift into a deep-cleaning session.
The quick end-of-day builder’s van reset
Before leaving the vehicle, take out food packaging, drink containers and general rubbish. Remove wet boots, clothing and towels when practical. Keep clean clothing separate from used workwear, and store wet kit outside the cab where you can. If conditions and parking allow, open the doors briefly in a safe place to let stale air escape.
Make it a quick final check, not another job on the list. Look at the cab floor and cargo area for anything left behind, especially food or damp items tucked out of sight.
The weekly clean that stops smells building up
Set aside a regular slot to vacuum the mats, seats and cargo-area edges. Wipe appropriate hard surfaces, then check storage boxes and under-seat areas for debris, forgotten food or damp kit. Lift removable mats to check underneath, and let cleaned surfaces dry completely before replacing them or putting equipment back.
If workwear has to travel in the van, use a separate bag or container to keep it apart from clean clothes and the cab where practical. The aim is simple: contain moisture and grime, and make it easy to spot anything that needs attention.
The routine, in one line: Clear rubbish and damp kit daily; vacuum, wipe, check mats and dry the interior weekly.
Consistency does the heavy lifting. Once the van is clean and dry, fragrance can be the finishing touch that makes the cabin feel more considered. Car scents for your van come in formats to suit different routines.
Finish with a fragrance that suits your builder’s van
A clean, dry van is ready for a fragrance that makes the cabin feel more considered. It’s the finishing touch, not a shortcut around cleaning. Choose a format that fits your everyday routine, follow its instructions and keep the scent measured, especially in a compact space.
Choose a fragrance format for your everyday routine
Each option brings fragrance into the vehicle differently. Think about how you prefer to use it, then explore the guide to adding a nice smell to your car for more scent advice.
- Vent clips: Fit at the vehicle’s air vent. A straightforward choice if you want fragrance positioned in the cab.
- Sprays: Apply according to the product directions. This format gives you a direct way to add fragrance when it suits your routine.
- Wood diffusers: A distinct option for adding fragrance inside the vehicle, in a different format from a vent clip or spray.
There’s no single right pick. Consider what feels practical for your van and how you want the cabin to smell. Choose a format you’ll use as directed, without crowding the space with competing scents.
Make fragrance the finishing touch, not the cleaning plan
Before adding fragrance, deal with the things that cause lingering odours: spills, rubbish, dampness and grime. If a musty smell keeps returning, look for its source instead of trying to cover it. Fragrance can elevate the atmosphere once the interior is clean and dry, but it can’t replace that work.
Use the amount and placement recommended in the product instructions. That keeps the scent intentional and helps it complement the fresh interior rather than overwhelm it. It’s the final step in how to keep a builder's van smelling clean: remove the cause, keep up the routine, then add the atmosphere you want.
For a finishing touch, find a Flava car scent for your clean-van routine.
Make a fresher van part of the routine
A clean-smelling builder’s van starts with the basics: remove the sources of odour, clean the surfaces, then dry and ventilate the interior. A quick reset at the end of a shift and a more thorough weekly clean help keep rubbish, dust and damp kit from building up again.
That’s the core of how to keep a builder's van smelling clean. Fragrance comes last, once the van is clean and dry. Choose a format that suits your everyday routine, whether that’s a vent clip, a spray or a wood diffuser. Refill sticks are also available for refillable vent car air fresheners.
Keep the routine simple and stay on top of damp kit. Explore Flava car scents to choose a finishing touch for your clean-van routine.
Frequently Asked Questions
Is an air freshener enough to keep a builder’s van smelling clean?
No. An air freshener adds fragrance, but it won’t remove food residue, damp clothing, dirty mats or rubbish. Find and clean the source first, then dry and ventilate the van. Once the interior is fresh and dry, fragrance can be a finishing touch. If a musty smell keeps returning, check for persistent dampness instead of adding more scent.
How do I get a musty smell out of a builder’s van?
Remove damp clothing, boots, towels and stored items, then check the mats, storage areas and cargo space for moisture. Clean suitable surfaces and let them dry fully, with ventilation where conditions allow. If the smell returns, investigate the source of the dampness or a possible leak. Fragrance may freshen the interior afterwards, but it won’t resolve moisture itself.
Can I use a car air freshener in a builder’s van?
Yes. Use a car fragrance as the final step after cleaning, and follow the product instructions. You could choose a vent clip, spray or wood diffuser, depending on the format that suits your routine. Keep the product secure and use it as directed. Fragrance can add a more pleasant atmosphere, but it shouldn’t replace removing rubbish, cleaning spills or drying wet kit.
What is the quickest way to freshen a work van after a shift?
Take out rubbish and food, remove wet workwear or boots where practical, and clear loose debris. Clean dirty surfaces using a suitable method, then let them dry. Briefly ventilate the van when it’s safe and practical to do so. This quick reset helps stop odours building up between jobs; a regular weekly clean can catch dirt around mats and storage.
How often should I clean a builder’s van interior?
Do a short reset after workdays to remove rubbish, food and damp items, then make a more thorough clean part of your regular weekly routine. Vacuum mats and cargo-area edges, wipe suitable surfaces, and check storage spaces. Adjust the frequency if the van carries muddy tools, wet equipment or spills. For how to keep a builder's van smelling clean, consistency matters more than waiting for a deep clean.
What should I do if the smell keeps coming back after cleaning?
Check again for hidden moisture, food or debris under mats, in seat seams, inside storage boxes and throughout the cargo area. Make sure cleaned surfaces and mats are completely dry before putting them back, and remove wet kit where practical. If the smell persists or you find dampness, investigate the underlying source. Adding more fragrance may only cover the smell temporarily.


Leave a comment
This site is protected by hCaptcha and the hCaptcha Privacy Policy and Terms of Service apply.